Quick Guide for EdrawMax Online
Looking for some help? Here you can get quick answers and step-by-step instructions on how to use EdrawMax Online.
EdrawMax Online Guide
-
Get Started with EdrawMax Online
-
Basic Shape Operations
-
Basic Elements
-
Format
-
Insert Object
-
Page Setting
-
Document
-
How to Create an Organizational Chart
-
How to Create a Floor Plan
-
How to Create a Gantt Chart
-
How to Customize Smart Shapes
-
EdrawMax App Guide
-
Video Tutorial
Insert Image
To insert an image, you can
- Go to Insert tab and choose Image, or press Ctrl + Alt + I directly;
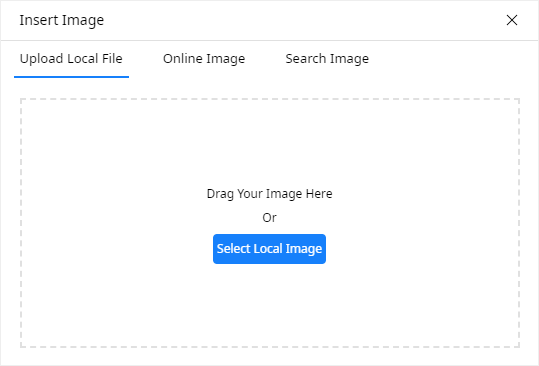
- In the pop-up Insert Image window, choose to insert images in 3 ways:
- Upload Local File: drag the image into the Insert Image window or select the image from local files.
- Online Image: paste the image URL in the blank bar and click Insert Image.
- Search Image: enter the search keyword in the search bar, click Search Image and click the desired image to insert it into the page.
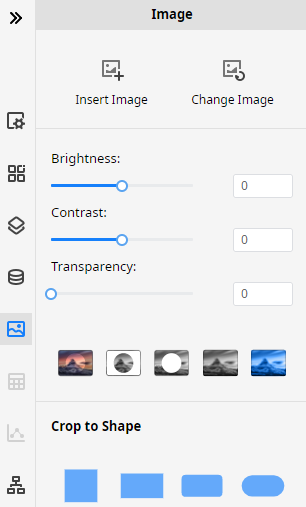
- Otherwise, click Image icon on the right sidebar to open Image pane and click Insert Image to insert an image from local files.

If the image is protected from citing by its source site, the image will fail to upload. In this case, you have to save images to local disk at first, then upload it from local files. Usually the free image websites allow to users to cite their image.
If the image is over-sized, there will be a reminder window to let you decide whether to compress the image or not.
To customize an image, select the image, then you can click Image icon on the right sidebar.

There are a series of options on the Image pane to customize an image:
- Insert Image: to insert an image from local files into the drawing page.
- Change Image: to change the selected image with alternative images in the local files.
- Brightness: to adjust the brightness of the selected image; the default number is 0.
- Contrast: to adjust the contrast of the selected image; the default number is 0.
- Transparency: to adjust the transparency of the selected image; the default number is 0.
There are also five buttons on the Image pane to customize an image:
- Crop to Shape
 :crop the selected image to remove the unwanted area with the below pre-defined shape frames.
 - Crop to a Custom Shape
 :put a customized shape on the image that you want to crop, select both the shape and image, and click the button to obtain the cropped image with the special shape frame.
 - Remove a Part from Image
 :put a shape on the image, select both of them, and click the button to take out a part of the image that is covered by the shape.
 - Original
 :click this button to regain the original state of the selected image.
 - Picture Filter
 :click this button to choose various filters for the selected image.


